After sketching out a rough idea of how an wave is formed, I was happy with how the wave was formed and how it gently falls to the surface of the water. I began colouring it so that you could see the foaming of the wave and how it blends back into the water when the splash has finished. I am really happy with the finished piece as it has a great flow and when the ball hits the water it has a realistic impact.
Monday, 31 October 2016
Water Splash TV Paint - Week 6
After sketching out a rough idea of how an wave is formed, I was happy with how the wave was formed and how it gently falls to the surface of the water. I began colouring it so that you could see the foaming of the wave and how it blends back into the water when the splash has finished. I am really happy with the finished piece as it has a great flow and when the ball hits the water it has a realistic impact.
Monday, 24 October 2016
Stop Motion Week 4 - Throwing a Ball
We are using the puppets this week again but this time to make it look like it is throwing a ball, it needs to have good anticipation and build up for it to be realistic.
Throwing a Ball
I found this weeks really challenging to create a realistic throwing action, I think that I need to include more frames as it is very quick and jumpy. I also think because I positioned the camera sideways this has made it look like he is not putting much power into his throw. I tried this quite a few times in the session but this was the best one I came up with. I think I will look at peoples on Friday and see where I went wrong. Then I can redo it.
Saturday, 22 October 2016
Walk Cycle TV Paint - Week 5
I am quite happy with my basic walk cycle, as it is clean and crisp, and the movements are quite realistic to a cartoon character. However I think I am going to refine it and make it into more of a fun character and do a background with it as well.
Wednesday, 19 October 2016
Maya Week 4 - Beaver in a 3D Environment
This week we were asked to put the principle of overlapping and follow through to use within an animated character. In this case it was the choice between a fox or a beaver. In lesson we experimented with the different segments of the character and saw how when you move one part it in turn manipulates another part of the tail. After getting a better understanding of how to get a good animation of the tail, we had to situate the animal in a 3D environment that it can play around.
I placed different cuboids to represent stairs so that it climbs up to reach a spiralling slide. I found it quite difficult to get the correct animation for the overlapping/follow through of the tail, especially when it was climbing the vertical stair case. I need to develop on creating more realistic of how a animal moves such as tail movement. I am happy with how it spirals down the staircase. I feel like this week my Maya skills have developed really well.
Tuesday, 18 October 2016
Stop Motion Week 3 - Puppet Reaching Down to its Toes
After being inducted on how to use stop motion puppets we were asked for it reach its toes including a little arm swinging. I was quite excited to try out the stop motion puppets however I think it will be also quite challenging as well to get the timing right. This was my result:
Touching Toes
I am quite please with how it has turned out because I like the timing of how the arms reach the toes. I also made sure that the head was the first thing that moved like we do when we touch our toes. The thing the I should of done was make the arms have a longer swing when he is bent of because I had made them quite small. It was quite an exciting experience using the stop motion puppets for the first time.
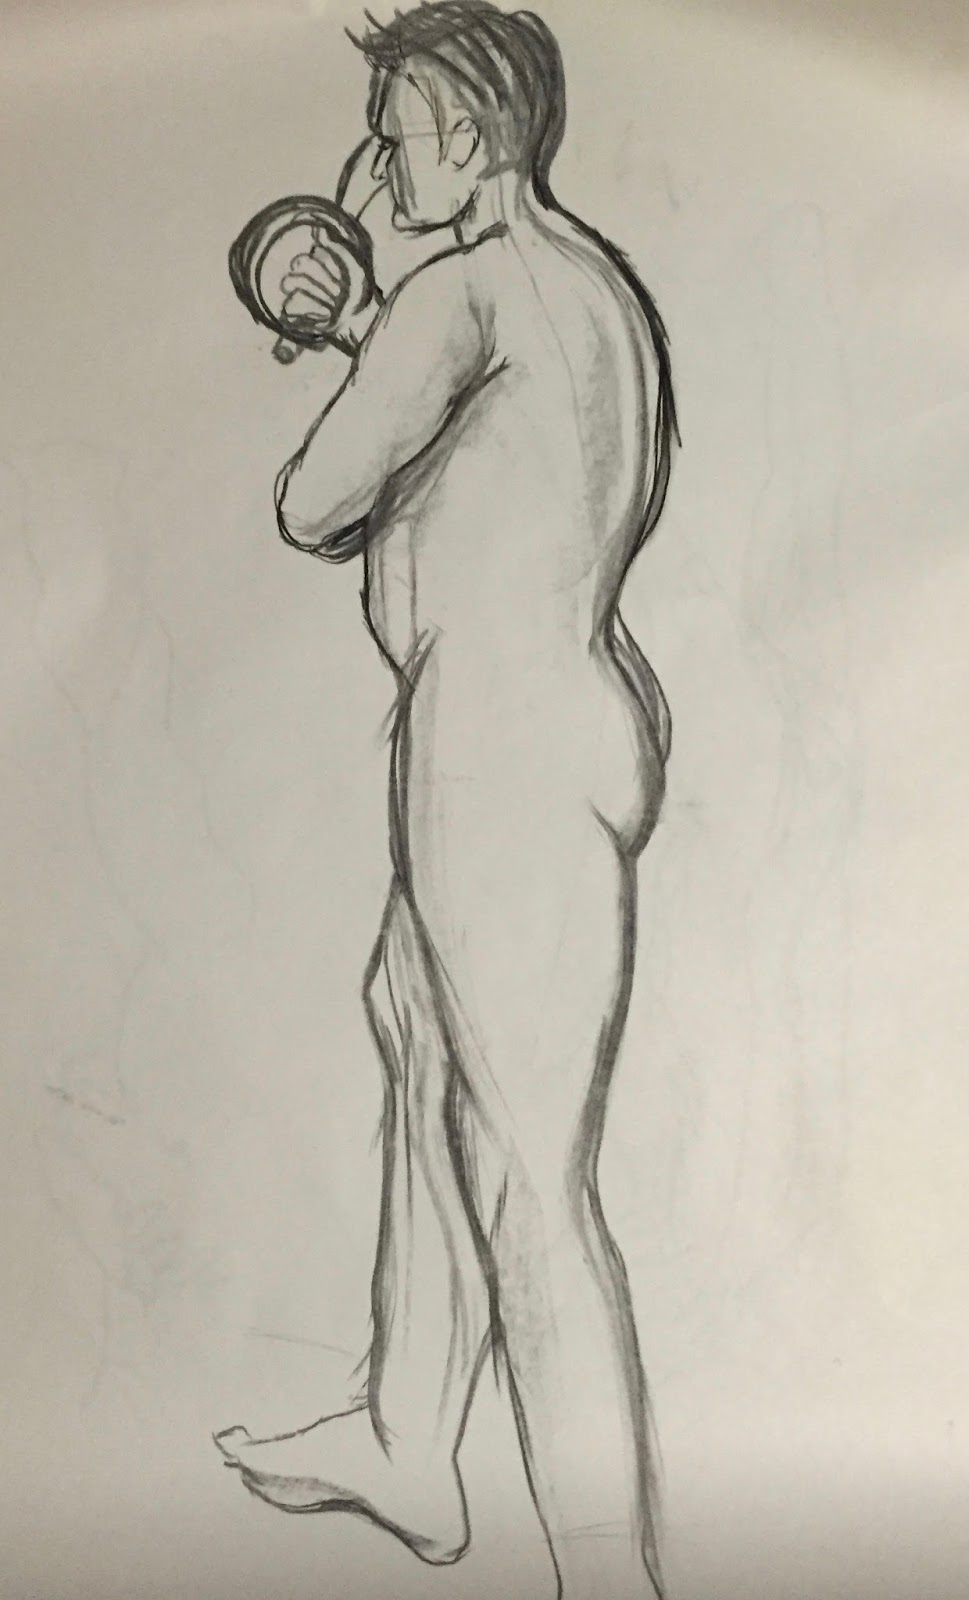
Life Drawing 3
This week we had a different male model for life drawing. To start the session we did 2 minute poses which were dynamic but very quick so we can briefly get the outline but still have the arcs of movement. We then did 5 minute poses with the model holding an umbrella. I like this one because the three drawings side by side make it look like an animation in itself.


After we got to use brown paper which was a nice change, with the paper we had to use different coloured chalk as well these had to be light tones such as whites, yellows blues which would contrast with the black chalk. We got give 30 minutes for this one. I found it quite difficult to get the proportions correct as looking back I can see the arm is slightly forward from where it is meant to be and the face is a little inaccurate. However I was more focusing on the colours and the light/dark areas of the skin.

Brown Paper Exercise
Moreover we then were asked to draw the model using negative space, I had never done this before so this was very new to me. If you get the shapes of the negative space correct then is it suppose to make your drawing's proportions more accurate. I was quite happy with how mine turned out. After we did another quick dynamic pose with a tennis racket. I have noticed in both the heads are a little too small.


Finally to end the session we did another dramatic pose on black paper with white chalk. I was more happy with how this weeks piece has turned out compared to last wee. I think I have given good muscle definition with the white toning of the skin. I was unhappy with the hand as I pt too much black in it so I was trying to correct it but in the end it just kept making it worse so I left it. Overall this is my favourite drawing that I have done in todays session.

Black and White life drawing
Monday, 17 October 2016
Head Turn - TV Paint Week 4
This week we were asked to animate a head turning. After the animation principles lecture, I need to take into account overlapping and follow through. I also knew that when you turn your head it doesn't turn in a straight line, the nose moves in the pathway of an arc.
After watching AMB Animation Academy's Video it inspired me to create a girl turning her head because I want to animate her hair so that it had the overlapping and follow through action. This was my result:
Head Turn Animation
This head turn took me longer than I expected, I first sketched the face on lots of frames so that I get a smoother head turn. I still feel at places the head turn needs to be smoother but it just took me so long. Next time I would also colour it in more properly rather then just colouring the hair and shirt. I am pleased with the final result as I found it really difficult keeping everything in proportion as sometimes it looked like the face shape had changed or the nose had and therefore there was no consistency. I really enjoyed using the cintique to get a more accurate line drawing, I felt this was easier to use then my normal tablet.
The hair's overlapping and follow through was a bit of a problem for me because I feel like more frames are need to get the swing of the hair to be more accurate. This is because it ends very suddenly and doesn't quite have the same natural element as our hair has. I know this for the future now when I come to animate hand drawn characters. Overall I have learnt that you must animate in arcs, and that hand drawn animation is very time consuming but the results are rewarding.
Wednesday, 12 October 2016
Squash and Stretch Ball - Week 3
First I key framed how a ball would be thrown across the room and then have it bounce against the remaining of the other walls, what I found difficult however was the timing between how a ball would hit one wall to another. For example when it would bounce against one wall it, it would then bounce in the direction towards another wall and then on the floor. At first I mucked up the timing as the transition between the two bounces was too slow and therefore it looked unrealistic, but I realised how to fix this so it now looks much better. I also likes how it looks with the squash and stretch.
Monday, 10 October 2016
TV Paint Cuboid Man Week 3
During our TV Paint tutorial lesson we had to animate a cuboid figure looking over his shoulder and then jumping over an obstacle. I manage to get the rough outline done in class and then outside of lessons I refined the line and made the frame work more realistic with the timings.
Falling Balloons and Heavy Ball Stop Motion Week 2
This week we had to animate a plasticine blood falling and then bouncing on the ground. I started by drawing a line of what I thought was going to be the path of the balloon. However drawing the fairings was really difficult to judge as I couldn't quite imagine the timings of a balloon falling because of how lightweight it is. This was my result:
Balloon Stop Motion
I am not too happy with it, as the timing is completely wrong, therefore I am planning to re do this later on when my skills have developed a bit better. Looking at others more realistic stop motion balloons I have figured where I have gone wrong; I need to have tighter fairings that the corners of the path so that it is slower when it falls.
The other stop motion task we got set was a heavy ball that is dropped from a height, this I found was easier then the previous task:
Heavy Ball Falling
I think I have got the timings much better in this one, you can tell that it is heavy by the little bounce that it does when it makes contact with the ground. Also I made sure the fairings where large when it is dropped so that it hits the ground quickly. I think I need to practice more on my timing with stop motion as they need to be more realistic in order for it to be animated well.
Friday, 7 October 2016
Stop Motion Week 1 - Pendulum
This week we were given the exercise of animating pendulums, we had to do a free swinging one, and a pendulum from a grandfather clock.
The key for this exercise was timing between the frames, we had to make sure that we placed the coin in the right timing in order for it to look realistic. Using DragonFrame for the first time was actually quite self explanatory and I didn't have much trouble with it.
Free Swinging Pendulum
Grandfather Clock
Tuesday, 4 October 2016
Life Drawing 2
This week we went back to life drawing with a male model. I have not don't life drawing with a model in a while so it was nice to get back in the routine of doing it. Once again we did various exercises to help develop our figure drawings. I really enjoyed this session as I believe I have produced some nice drawings.


Dynamic Poses with Sport Bat / Racket


More Detailed Life Drawing
Life Drawing

Where every 2 minutes we would stop and pass onto the left persons drawing and work on theirs and repeat this several times. This ends up with a drawing composed from lots of different people and it ended up with something that I would have no idea that it would look like that. I really like this activity and it was quite a fun exercise.
Black and White Drawing

We got given white chalk and black charcoal and had to do a long half an hour life drawing. I found that it was quite difficult to find the light places in the body and then translating this into black and white in my drawing.
Blind drawing

This is a drawing where we had to only look at the male model and then draw without looking at the paper. We had to do this for five minutes which I found too long as I had finished mine really early. I am happy with how this turned out though cause it does vaguely the model as well.
Monday, 3 October 2016
TV Paint Bouncing Ball in a 3D room
We got set the task to trying to draw on TV paint a ball bouncing around the room. We got given this video as a reference:
This took me one hour and a bit, however once I got the hang with how the software work it was much smoother. This is the finished project that I had done:
However the brief does say not to copy the video step by step, also not to stretch the ball so keep it round. The reason why I decided to copy it was to just understand how the program works and learn how to use the shadow. I was planning to copy the video, and then produce my own 3D room with a more circular room. This was more like a practice run so that I can understand the physics of how a ball bounces within a 3D environment.
After reading the brief and realising that I needed to go over it again but not including the squash and stretch and make it look less there the example video. I drew my own visual 3D room and tried to draw frame by frame the motion of a ball bouncing against the walls of the room. This was quite hard to visualise as I was trying to get the framing right that as it bounces off the walls the ball would be travelling faster which means shorter frames. As it decelerates the frames would be longer to show that it is slowing down.
Overall I am enjoying getting to know how TV Paint works and look forward to developing my skills within 2D animation.
Subscribe to:
Comments (Atom)